Turn on Tracking Autotune 5 Fl Studio
In this guide, we will show you how to use the Antares Auto-Tune software for the first time. The features discussed are most applicable to Auto-Tune Pro, but the concepts are relevant to other Auto-Tune software versions. Follow each of the sections below to get started. Don't hesitate to check out the Auto-Tune software manual and learn more about each feature and control, too!
- What is Auto-Tune?
- How does Auto-Tune work?
- Three things to know before using Auto-Tune
- Song's key
- Input type
- Retune speed
- How to use Auto-Tune
- Auto Mode
- Graph Mode
- Classic Mode
Auto-Tune is a powerful pitch-correction software and is primarily used to fix slightly off-pitch notes in vocal performances. This makes recording vocals a lot less painful since you don't have to record take after take trying to get that perfect recording. The Auto-Tune software is also trendy and well-known for getting that very robotic sound you hear from artists like T-Pain and Daft Punk.
While there is other pitch correction software on the market, its streamlined interface makes it a simple and effective pitch correction tool. It is the go-to for many producers and musicians, beginners and professionals alike. This shouldn't be confused with a vocoder or talk box effect, though. While they all can alter the sound and timbre of your voice, vocoders and talk boxes require a secondary input such as a synth or guitar pedal to process the effect.
RETURN TO TOP ↑
Auto-Tune works by receiving an input signal, detecting its pitch, and then altering it to your specifications. Auto-Tune Pro has two operation modes: Auto or Graph. In Auto Mode, the plug-in automatically adjusts each note to its closest pitch based on the selected key and correction settings. Graph Mode takes Auto Mode one step further by giving you precise control over the pitch correction.
While Auto Mode corrects pitch right away, Graph Mode requires the audio first needs to be scanned, played back, and analyzed before pitch corrections can be written. Supported ARA-compatible DAW's (like Studio One 3 and 4 ) do not require analyzing audio files as the audio's pitch information is automatically sent to Auto-Tune Pro once inserted to the track.
EFX 3 and AVOX 4 plug-ins have specific features intended for processing or effects. They do not offer a graph mode but are instead designed as automatic plug-in effects.
Corrects pitch from a graphical editing interface.
Continuously tracks and corrects pitch.
RETURN TO TOP ↑
While Auto-Tune is packed full of features and functions, there are three core things to know before you start using the Auto-Tune software, or if you already have it, to make it sound better. These include the key of the song, the type of input you're using it on, and the retune speed.
To get the best key for Auto-Tune, you'll know what the key of your song is. If your song is in the key of D Minor, you'll want to set Auto-Tune to the same key. If it's not set correctly, the pitch correction will be inconsistent, and you may run into an undesirable sound.
If you aren't sure of the song's key, the Auto-Key plug-in can do wonders. It listens to its audio track, determines what key is used, and then sends it to all other instances of Auto-Tune loaded. You can also scan audio files from outside your DAW by clicking the File… button. This is particularly useful for scanning audio before including it as a sample within your music. Regardless of keys selected by Auto-Key, you can always adjust the key, scale, and transposition settings within the Auto-Tune plug-in.
Auto-Key – Analyzing Key and Scale
Auto-Tune also relies on the octave range of the track you're applying the plug-in. So if you want to "autotune" a female voice, you'll more than likely choose Soprano as the input type. Again, if this isn't set correctly, then you'll have a very inconsistent sounding track.
IMPORTANT: No matter how slow or fast the Retune speed is set at, the track needs to be as in key as possible to get the desired effect.
This is probably one of the most important settings you'll need to play with. What this does is determines how fast or slow the plug-in will pitch correct an incoming note. If it's set to a slower speed, you'll have a more natural sound and allow more vibrato to come through. When you start increasing the speed, the more "unnatural" it will sound. So, if you want that robotic "T-Pain autotune" sound, crank it up to 0 (you'll probably hear a term like "set to 0" or "use the autotune knob" when working with the retune speed.)
Getting the Auto-Tune Effect with Auto Tune Pro
RETURN TO TOP ↑
Auto-Tune is usually used in one of two ways: pitch correction or effect. Whether you need a little pitch correction for consistency or all-out robotic effects, Auto-Tune can do the job. When you need to apply a little (or a lot) of pitch correction, a transparent, less noticeable effect is desirable. If the pitch isn't an issue and you want an effect, a unique, creative sound is often preferred. We'll show you how to use each operation mode below. Once you get used to the plug-in, take some time to experiment and create different results.
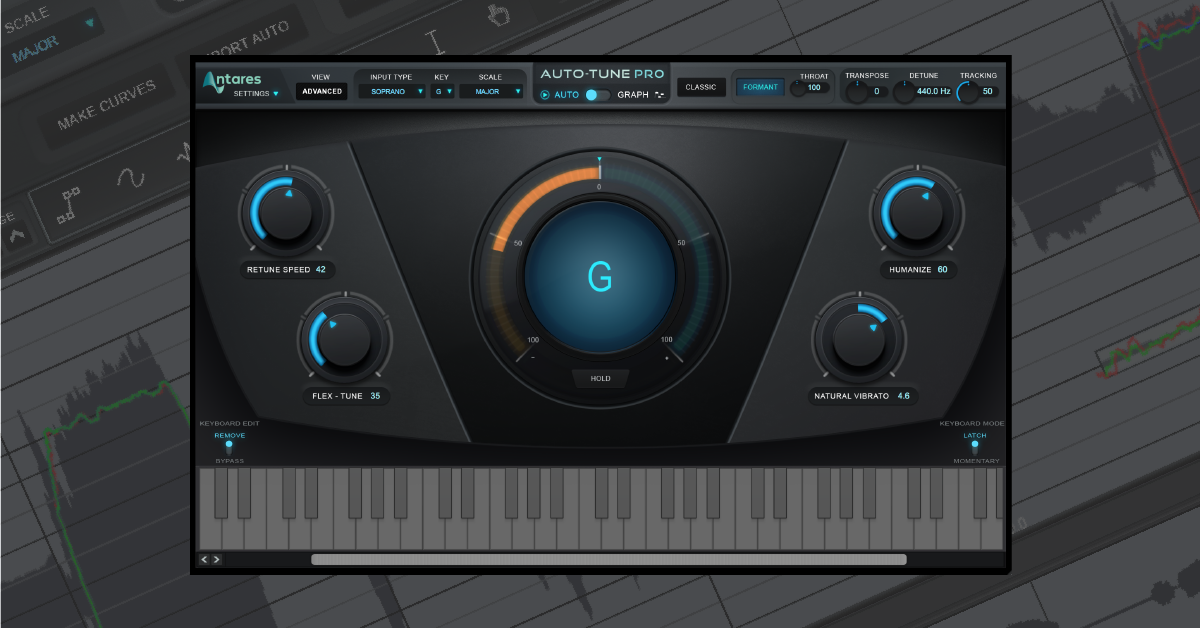
Auto-mode is the default operation for Auto-Tune. It automatically corrects the audio's pitch to the selected KEY and SCALE controls. After that, all you need to adjust is the RETUNE SPEED. Click the ADVANCED (underneath VIEW) to access the more pitch and vibrato controls.
- Select the input type that best matches your audio:
- Soprano
- Alto/Tenor
- Low Male
- Instrument
- Bass Instrument
- Select the key and scale settings.
- Set the tracking control to adjust Auto-Tune's input sensitivity.
- The default tracking control value is 50.
- Focus the tracking by turning the tracking control lower (1-50).
- Relax the tracking by turning the tracking control higher (50-100).
- Adjust the Retune Speed to taste.
When you use the Transpose feature, the voices resonant frequencies will shift. Adjusting the Formant in Auto-Tune prevents this from happening and creates a more natural result, ensuring the vocal characteristics are preserved, especially over larger transpositions. Once Formant is enabled, adjust the Throat Length setting to compliment the amount of transposition.

Auto Mode.
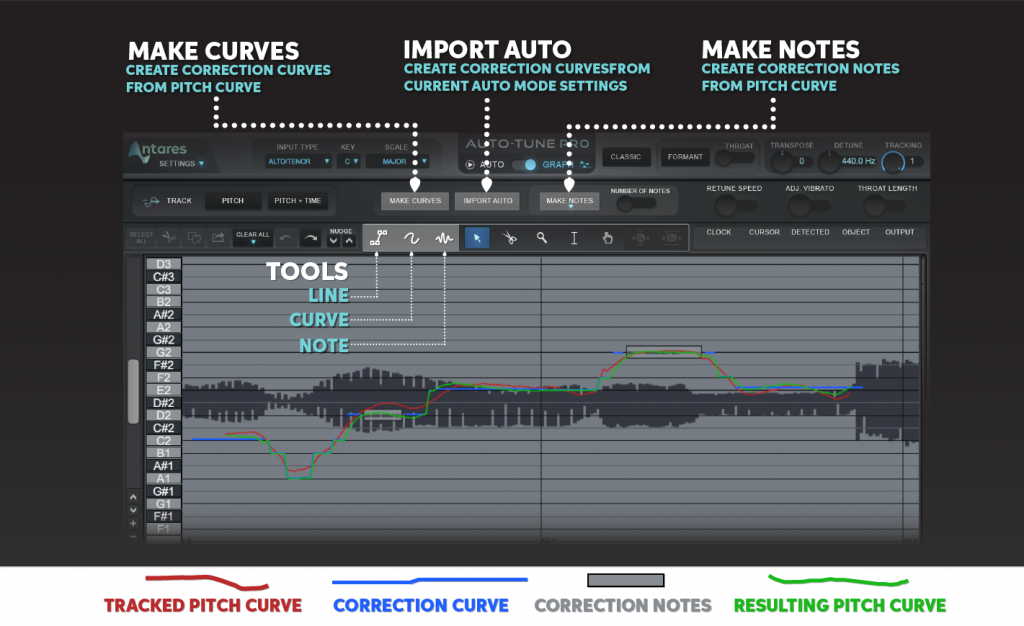
While Auto Mode only requires adjusting a few knobs, Graph Mode provides a graphical interface for tracking and editing pitch and time information. Auto Mode starts working immediately, but Graph Mode requires the pitch to be tracked within the plug-in first. That means you'll need to track the pitch information by either playing back the entire audio track or selecting a specific region. Once the pitch curve data is tracked, you can edit it by creating and modifying Correction Objects.
Change graph window size: You can customize the graph window size by clicking the SETTINGS button and choosing Preferences…. Consider using a larger window for greater editing resolution and usability.
Correction objects and Editing tools
- Correction Objects: what Auto-Tune continuously adjusts the original pitch to. They can be curves, lines, or notes, and can be drawn manually or generated from the MAKE CURVES, IMPORT AUTO or MAKE NOTES buttons.
- Curves: Tracked pitch data is represented in the graph as red curves. They are only for viewing the original pitch and are not editable. Blue curves are the Correction Objects and represent the pitches that Auto-Tune will tune towards. After applying the corrections to the original pitch, the resulting pitch, and what you hear represent a green curve. Notice that when fast Retune Speeds are used, the green curve will be less curvy and have more distinct pitch changes.
- Lines and Notes: Besides the blue curves, there are two other corrective objects: lines and notes. Lines are just like curves, except they can't curve. Use the line tool to draw a static pitch or linearly change the pitch. Notes are similar to lines, but can only represent a single pitch at a time.
- Insert the Auto-Tune plug-in onto an audio track.
- Click the AUTO button, playback a melodic section of the vocal, and set your initial settings. These settings will be applied in step 6 with the IMPORT AUTO function.
- Click the GRAPH button to enter the Graph operational mode.
- Select which information to track by clicking either the PITCH or PITCH + TIME button.
- Either play back the entire vocal performance or just a specific region for Auto-Tune to track pitch information.
- Create and edit Correction Objects:
- (optional) Click MAKE CURVES to create correction curve from the original pitch data.
- (optional) Click IMPORT AUTO to apply the current Auto Mode settings to all curves.
- (optional) Click the MAKE NOTES to create correction notes from the original pitch data.
Graph Mode reference chart
RETURN TO TOP ↑
Auto-Tune 5 had a famous definitive sound. Auto-Tune Pro and Auto-Tune Artist feature Classic Mode, which is an Auto-Tune 5 recreation that sounds slightly brighter and has a more noticeable attack and shift between pitches at faster retune speeds. Press the CLASSIC button to enter Classic Mode and disable some of Auto-Tune Pro's newer features like Formant, Throat Length, Transpose, Flex-Tune, and Time Editing.
Using Classic Mode
RETURN TO TOP ↑
Auto-Tune is a plug-in that has both simple and advanced features. Check out the useful videos below and visit the Antares YouTube channel for more Auto-Tune videos.
Mischke Interview
Auto-Tune Pro Basic Vocal Tuning
Auto-Tune Pro MIDI Control
Mischke Auto-Tune Pro Vocal Production Tips
Auto-Tune Pro Melodic Alterations
Auto-Tune EFX+ Tutorial
When you need help, Sweetwater has the answers!
Our knowledge base contains over 28,000 expertly written tech articles that will give you answers and help you get the most out of your gear. Our pro musicians and gear experts update content daily to keep you informed and on your way. Best of all, it's totally FREE, and it's just another reason that you get more at Sweetwater.com.

Turn on Tracking Autotune 5 Fl Studio
Source: https://www.sweetwater.com/sweetcare/articles/auto-tune-quickstart-guide/
0 Response to "Turn on Tracking Autotune 5 Fl Studio"
Post a Comment